
A vacuum cleaner is one of the most important household tools for keeping floors clean and dust-free. But one of the most common problems users face is a broken or worn-out belt. If you know how to replace a vacuum cleaner belt, you can save time, avoid costly repairs, and keep your machine working like new. This step-by-step guide will show you exactly how to do it.
Table of Contents
Introduction
A vacuum cleaner is only as effective as its parts. One of the most important is the belt, which powers the brush roll and helps lift dirt, dust, and debris from your floors. Over time, belts can wear down, stretch, or break, causing reduced suction, uneven cleaning, or unusual noises.
While replacing a vacuum belt might sound tricky, it’s actually quite simple. With a few tools and clear instructions, most users can handle it themselves. Whether you own a Bissell, Dyson, Shark, or another popular brand, the basic steps are very similar.
Belts may be small, but they play a big role in how your vacuum performs. They transfer energy from the motor to the brush roll, ensuring your vacuum can pick up dust, pet hair, and crumbs efficiently. Without a properly working belt, your vacuum struggles to clean effectively.
In this guide, you’ll learn how to check your belt, replace it if necessary, and take steps to maintain it. We’ll also share tips for keeping your vacuum in top shape, so it continues to run smoothly and lasts longer. Following these steps helps maintain suction power and ensures every cleaning session is effective.
What Is a Vacuum Cleaner Belt & Why Is It Important?
A vacuum cleaner belt is a small, stretchy rubber loop inside the vacuum. It connects the motor to the brushroll, which is the spinning part that cleans dirt and dust from your floors. When the motor runs, the belt turns the brushroll so the vacuum can suck up dirt, pet hair, and crumbs.
Why Is It Important–
- Transfers Power: The belt moves power from the motor to the brush so it can spin and clean your floors well.
- Keeps Cleaning Strong: A good belt ensures the brush spins at the right speed to pick up dirt and dust.
- Prevents Vacuum Damage: If the belt is broken or slipping, it can cause other parts of the vacuum to break or work harder.
- Maintains Suction: When the belt is old or worn, the brush doesn’t spin properly, so the vacuum doesn’t clean as well.
- Saves Money: Changing the belt early can stop bigger problems and save you money on repairs later.
Why Should You Check the Belt?

Checking the vacuum belt helps ensure proper cleaning. If it’s worn or broken, the brush won’t spin, which reduces suction and leaves dirt behind. It’s a simple fix that can prevent bigger issues.
How to Know When Your Vacuum Belt Needs Replacing
Here are common signs that it might need replacing:
- Reduced Suction Power: It doesn’t spin as much anymore, making the cleaning less effective.
- Strange Noises: A spinning or burning smell can indicate a broken or slipping belt or even a damaged vacuum hose.
- Visible Wear and Tear: If you notice cracks, splits, or excessive stretching on your belt, it’s time to get a new one.
- Brush Roll Not Spinning: Without it, your vacuum won’t pick up debris efficiently, and the belt is the one that drives the brush roll.
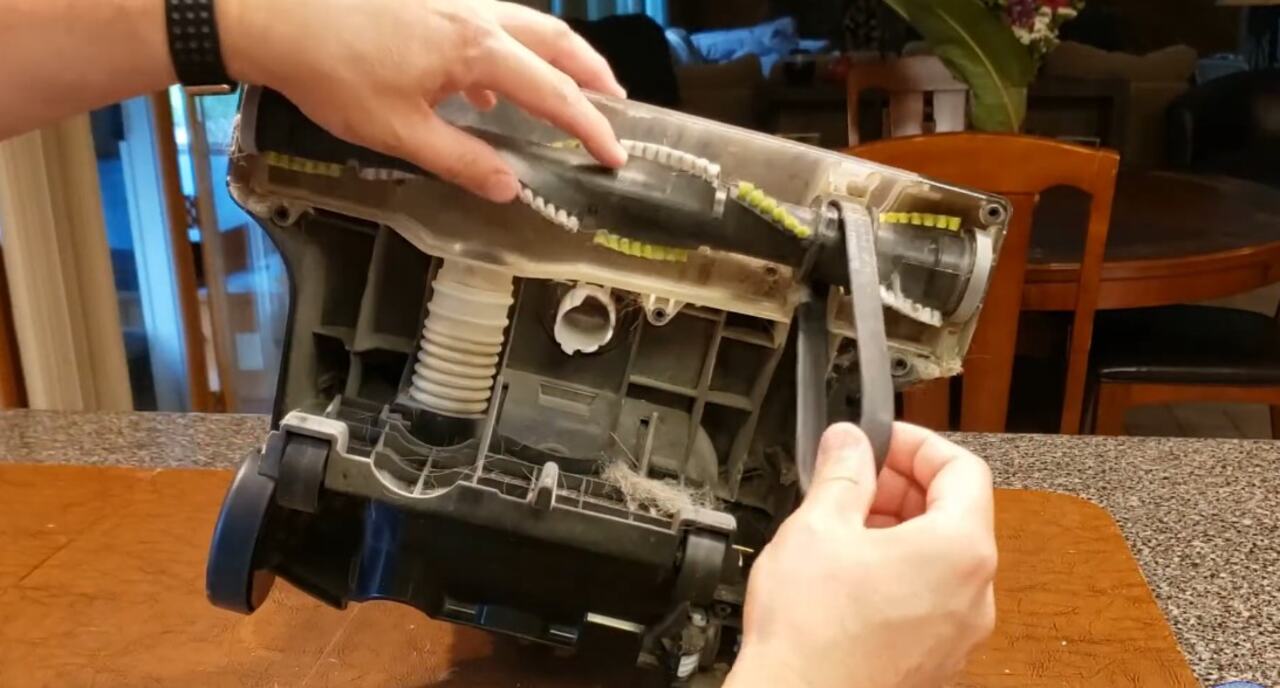
How to Replace a Vacuum Cleaner Belt?
At first, changing a vacuum cleaner belt may seem hard, but it is a simple process that can improve your vacuum’s performance. In this guide, I will tell you how to replace a vacuum cleaner belt. Just follow these easy steps:
Gather these tools before you start
Replacing a vacuum cleaner belt is simple if you have the right tools:
- A replacement belt (compatible with your vacuum model)
- Screwdriver (Phillips or flathead, depending on your vacuum)
- Scissors or a utility knife (optional)
- A clean cloth or brush for cleaning debris
Step-by-Step Guide to Replace a Vacuum Cleaner Belt

Replacing a vacuum cleaner belt involves two main steps: removing the old belt and installing the new one. Let’s break down each step with detailed instructions to make the process clear and manageable.
- Turn Off and Unplug the Vacuum:
- Safety first! Ensure the vacuum is unplugged before disassembly. This prevents accidental start-ups during the process.
- Access the Belt Area:
- Flip the vacuum cleaner upside down to expose the bottom plate. Locate the screws that secure the plate and use a screwdriver to remove them. Carefully lift off the cover to reveal the brush roll and belt.
- Remove the Brush Roll:
- Gently lift the brush roll out of its housing. You might need to slide it slightly to free it from the belt’s grip.
- Examine the belt. If it’s broken, it will come off easily. If intact but worn, slide it off the motor shaft and brush roll.

Installing the New Belt
- Position the New Belt:
- Take the replacement belt and loop it onto the motor shaft first. Make sure it sits securely in place.
- Stretch the other end over the brush roll. It should fit snugly without excessive slack.
- Reinstall the Brush Roll:
- Align the brush roll with its slots. Ensure the belt stays in the correct groove on the roll to prevent slipping.
- Push the brush roll back into its housing, making sure it spins freely.
- Reassemble the Vacuum:
- Replace the bottom cover and screw it back into place, and screw it in tightly.
- Ensure all screws are properly tightened so nothing is loose.
- Stand the vacuum upright and plug it in.
- Your vacuum is now ready to use again.
- Test the Vacuum:
- Plug the vacuum back in and turn it on. Observe the brush roll to confirm it spins properly. If everything is in place, your vacuum should work efficiently again.
Tips for Maintaining Vacuum Cleaner Belts
Extend the Lifespan of Your Belt
- Clean the Brush Roll Regularly:
- Remove tangled hair and debris to reduce strain on the belt. Also, clean the vacuum filter; if it’s dirty, the belt has to work harder.
- Avoid Overloading the Vacuum:
- Don’t pick up oversized items that can jam the brush roll.
- Replace Belts Annually:
- Even if it isn’t broken, replacing the belt yearly ensures peak performance.
FAQ
How Do I Know Which Belt to Buy?
Model number check and refer manual to identify the proper belt. For most manufacturers, a list of compatible belts for their models is usually provided. You can go to the manufacturer’s website or customer support for guidance. Common vacuum belt sizes are carried in stores that carry local appliance stores.
Can I Replace the Belt Without Tools?
Many modern vacuums are tool-free, but most still require at least a screwdriver to get to the belt location. If you have a snap-on cover, you may be able to replace the belt without tools. So, check your vacuum’s manual for details.
Why Does My New Belt Keep Breaking?
A new belt can fail because, for example, a belt is over-stretched when installed or a belt is out of alignment. Also, debris being caught in the brush roll can strain the belt and cause it to break. In addition, the wrong belt size will cause premature wear or even belt breakage. It has to be properly installed and maintained in order to avoid these problems.
How Often Should I Replace the Belt?
Belt replacement frequency is determined by usage. When not abused (as described in the belt section), you should replace the belt every 6-12 months for average use. You may have to replace your Hoover more often if you tend to use the vacuum on high-pile carpets or for heavy-duty cleaning.
Can I Reuse an Old Belt?
Instead, do not reuse an old belt. Over time, your belts lose their elasticity and can become brittle. Slighting or breaking a reused belt decreases the effectiveness of the vacuum. Once a belt wears out, always use a new belt for replacements for reliable performance.
Final Thoughts
An essential skill behind the wheels of a vacuum cleaner’s efficiency replacement is the vacuum cleaner belt. Learning this simple task will help you save money on repairs and increase the life of your vacuum cleaner.
The belt is a very important component of the brush roll that helps the brush roll spin around, causing the dirt and debris to pick up. If ignored, the vacuum will perform poorly in cleaning, and the other vacuum parts will suffer unnecessary wear.
Here are key points to keep in mind:
- Never use a belt that is too small or too tall for your vacuum model. Go by the manual or the manufacturer’s website. Regular maintenance, like cleaning the brush roll or checking the belt wear, helps to avoid problems in the first place. If you begin to see signs of damage or reduced performance, replace the belt promptly manual or the manufacturer’s website for guidance.
- Perform regular maintenance, such as cleaning the brush roll and checking for belt wear, to prevent issues before they arise.
- Replace the belt promptly if you notice signs of damage or reduced performance. Replacing too long with your vacuum cleaner belt not only means its cleaning power has been restored, but it prolongs the lifespan of the appliance. Whatever Bissell, Shark, or Dyson, this particular guide applies to all of them.
Now, you know how to change vacuum belt step by step, so it’s time to put your knowledge into action. Keeping your vacuum cleaner in top shape means a cleaner home with less hassle. Start now and have the pleasure of completing a job well done.

Welcome to Homenias, I’m Jaman M, and I’m here to help you discover the best home products. With years of experience, they offer genuine reviews and helpful guides. Their mission is to make your choices easier. It’s organizing your space or finding creative solutions. Explore how the right products can enhance your everyday life. Don’t miss out on finding the best home products to raise your living experience.